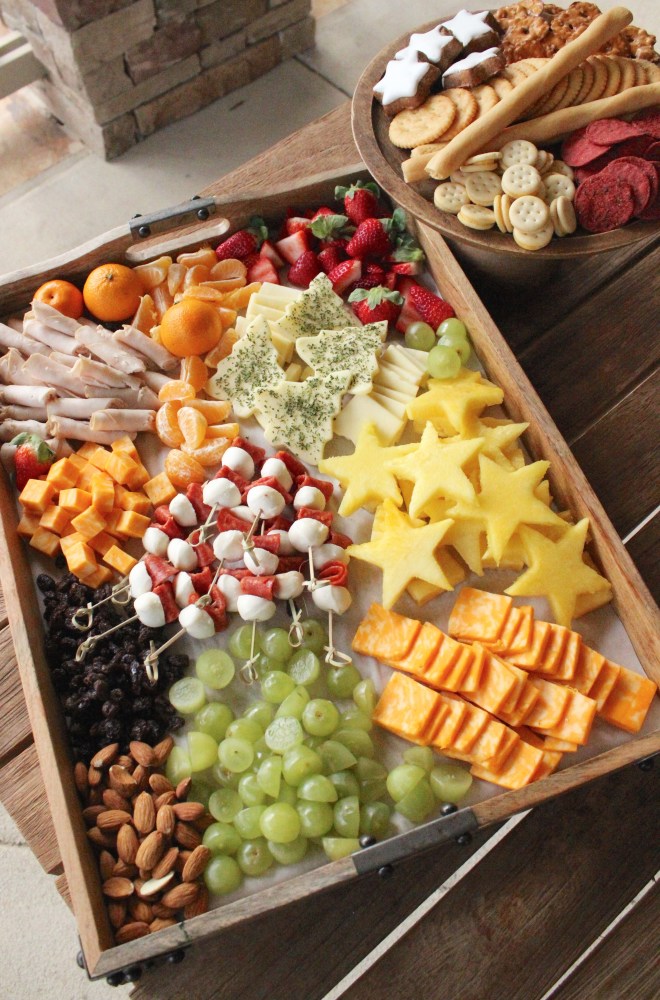
For the past few months, my friend Ashley has hosted a group of moms for a small group. We have been reading Present Over Perfect (which is terrific!), but mainly we chat about mom things and encourage one another. As moms of small children, girlfriends can be a true treasure! To celebrate Christmas, Ashley had all of us, PLUS our kids, over for a little party yesterday. The kids decorated cookies, played, and watched a little Elf. They also brought toys to donate to a local charity called Matthews Help Center. We all chipped in a bit, and I offered to bring a kid-friendly holiday cheese tray. I put a teaser of the cheese tray on instagram last night, but I wanted to share all of the details here!


I’ve listed out all of the ingredients I chose, and why. I also listed sources for similar trays (I use my wooden tray ALL the time), wooden cake stand, and any other items I used.
If you’re looking for a guideline on how to make a cheese and charcuterie platter for adults, I have a blog post about that as well! It is from a few years ago, but has made the rounds on Pinterest, and is still one of my most popular posts. Can you tell I love putting together cheese trays?!


cheeses
For this cheese tray I wanted to use cheese that the kids would like. I stayed away from anything too strong or stinky or creamy.
- Monterey Jack
- I cut some into Christmas trees using a cookie cutter, and dusted those with dried parsley (fresh would be better) for the green color
- Colby Jack
- I cut some into slices, and some into cubes
- Mozzarella balls
- These were cut in half and paired with the pepperoni to be red and white striped like a candy cane
meat
I picked more kid-friendly meat, rather than my usual prosciutto and salami.
- Deli Turkey
- I rolled each slice and cut them in half
- Pepperoni
- I folded the circles and put them on the skewers with the mozzarella to be reminiscent of candy cane stripes
fruit
- Strawberries
- I kept some of the tops on to add a touch of green
- Green Grapes
- I cut them into quarters to help prevent any choking
- Mandarin Oranges
- I peeled some and kept some whole, just to add that pop of color.
- Pineapple
- I cut this into stars! I took pictures as I cut it, and have a little tutorial at the bottom of this post
extras
- Raisins
- Almonds
crackers
- Round, Buttery Crackers
- Similar to Ritz, but I bought them from Trader Joe’s
- Breadsticks
- Just because of the fun shape
- Gluten Free Option
- The red ones are beet crackers from Trader Joe’s. I chose them because they add a pop of red to the platter
- Cheese Sandwich Crackers
- Because kids love these
- Pretzels
- Crowd-pleaser. I chose flat ones so that they could be paired with a slice of cheese
- Star Cookies
- Obviously these are not crackers, but the holiday touch was too good not to use them. Try to find something Christmas-themed and add it to your cracker tray.

other supplies and serving pieces
- Parchment Paper
- I always line the bottom of my cheese trays with parchment. I prefer using this natural, brown parchment (I ran out and didn’t have any on hand this time)
- Bamboo Skewers
- These are the prettiest for appetizers!
- Wooden Tray
 ONE | TWO | THREE | FOUR
 - Wooden Cake Stand
- You could use another platter for the crackers, which is what I ended up doing for the party. But the cake stand is so fun and adds some height

ONE | TWO | THREE | FOUR | FIVE

How to Cut a Pineapple Into Stars
I know that cutting large fruit, like pineapple and melons, can be tricky sometimes. So I wanted to share my tips and step-by-step pictures on how to cut the pineapple into stars. This method would work well with a melon as well!

- Using a large (I prefer serrated) knife, cut the top and bottom off of the pineapple
- Stand the pineapple up, and cut the exterior off, cutting from top to bottom. Make sure to cut far enough in that the brown spots are cut out.
- Cut one of the pointed corner sides off.
- Slice a 1/4-1/2 inch piece from one side.
- Then cut another piece the same size. This will put you close to the core, but you should be able to get two slices out of this.
- Do the same on the other side of the pineapple, so that you end up with four slices that you can use the cookie cutter on.
- Lay those pieces flat, and press the cookie cutter down hard enough to cut through the fruit. If there are any rough edges, use a paring knife to cut them off and create a smooth side to the star.
- Cut up any extra pineapple and use on the cheese tray, underneath the stars.
I hope this post will be helpful to some of you! If you decide to throw a party and make a similar cheese tray, I would LOVE to hear about it! You can tag me on instagram @lindsaykingdon and use the hashtag #sevenlayercharlotte or comment on this post. 🙂
Thank you for reading!
![]()


You are supermom! This looks AMAZING and so yummy!
You are so sweet! I’m definitely not supermom, but I appreciate the compliment anyway! xo
What are those crackers/cookies with the white topping?